Hello everyone, welcome back at porkaone. On this occasion we will learn how to create a login and the process in Flutter using API data from dummyjson.com. Are you curious? Come on, follow the tutorial below.
In this tutorial we will create a login feature using api data sourced from dummyjson.com/users. This fire contains a lot of user data starting from ID, name, username, email, password and many others. This time we will only use some data.
In the process, we will create a login page, if user data is found it will be directed to the home page. The home page contains data on name, email, username, photo, age and several other data. To see the results, you can immediately scroll to the bottom of our tutorial this time.
| Read Another Article ✨ |
| 📰 1. How to Display a Website in Flutter with Webview read more |
| 📰 2. How to Make a Bubble Bottom Bar in Flutter read more |
|
📰 3. How to Install Java Development Kit and Add Variable Path to
ENV read more |
|
📰 4. How to Make Copy Feature in Flutter Apps read more |
How to Create a Custom Login in Flutter
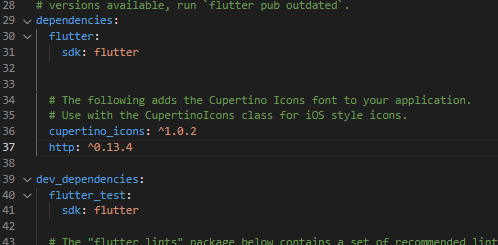
2. Open the pubspec.yaml file then add http: ^0.13.4. How to add it is as shown in the image below.
|
| Add Package |
3. Create a new file in the lib folder with the name user.dart and follow the script below. We use this file to create a data model or data structure.
class User {
  final int id;
  final String firstName;
  final String lastName;
  final String maidenName;
  final int age;
  final String gender;
  final String email;
  final String phone;
  final String username;
  final String password;
  final String birthDate;
  final String image;

  User({
    required this.id,
    required this.firstName,
    required this.lastName,
    required this.maidenName,
    required this.age,
    required this.gender,
    required this.email,
    required this.phone,
    required this.username,
    required this.password,
    required this.birthDate,
    required this.image,
  });

  factory User.fromJson(Map<String, dynamic> json) {
    return User(
      id: json['id'],
      firstName: json['firstName'],
      lastName: json['lastName'],
      maidenName: json['maidenName'],
      age: json['age'],
      gender: json['gender'],
      email: json['email'],
      phone: json['phone'],
      username: json['username'],
      password: json['password'],
      birthDate: json['birthDate'],
      image: json['image'],
    );
  }
}
4. Create a new file in the lib folder with the name login_page.dart and follow the script below. This file will display a login page containing an email and password form.
  import 'package:flutter/material.dart';
  import 'package:http/http.dart' as http;
  import 'dart:convert';

  import 'user.dart';
  import 'home_page.dart';

  class LoginPage extends StatefulWidget {
    @override
    _LoginPageState createState() => _LoginPageState();
  }

  class _LoginPageState extends State<LoginPage> {
    TextEditingController emailController = TextEditingController();
    TextEditingController passwordController = TextEditingController();

    Future<User?> loginUser(String email, String password) async {
      final response = await http.get(Uri.parse('https://dummyjson.com/users'));
      if (response.statusCode == 200) {
        final jsonData = json.decode(response.body)['users'];
        print(jsonData);
        for (var user in jsonData) {
          if (user['email'] == email && user['password'] == password) {
            return User.fromJson(user);
          }
        }
      }
      return null;
    }

    void handleLogin() async {
      String email = emailController.text;
      String password = passwordController.text;

      User? user = await loginUser(email, password);

      if (user != null) {
        Navigator.push(
          context,
          MaterialPageRoute(
            builder: (context) => HomePage(user: user),
          ),
        );
      } else {
        showDialog(
          context: context,
          builder: (context) => AlertDialog(
            title: Text('Login Gagal'),
            content: Text('Email atau password salah.'),
            actions: [
              TextButton(
                onPressed: () => Navigator.pop(context),
                child: Text('OK'),
              ),
            ],
          ),
        );
      }
    }

    @override
    Widget build(BuildContext context) {
      return Scaffold(
        appBar: AppBar(
          title: Text('Login'),
        ),
        body: Padding(
          padding: EdgeInsets.all(20.0),
          child: Column(
            mainAxisAlignment: MainAxisAlignment.center,
            children: [
              TextField(
                controller: emailController,
                decoration: InputDecoration(
                  labelText: 'Email',
                ),
              ),
              SizedBox(height: 20.0),
              TextField(
                controller: passwordController,
                obscureText: true,
                decoration: InputDecoration(
                  labelText: 'Password',
                ),
              ),
              SizedBox(height: 20.0),
              ElevatedButton(
                onPressed: handleLogin,
                child: Text('Login'),
              ),
            ],
          ),
        ),
      );
    }
  }
5. Create a new file in the lib folder with the name home_page.dart and follow the script below. We use this file to display the home page containing user data after the user has successfully logged in.
  import 'package:flutter/material.dart';
  import 'login_page.dart';
  import 'user.dart';

  class HomePage extends StatelessWidget {
    final User user;

    HomePage({required this.user});

    void handleLogout(BuildContext context) {
      Navigator.pushAndRemoveUntil(
        context,
        MaterialPageRoute(builder: (context) => LoginPage()),
        (route) => false,
      );
    }

    @override
    Widget build(BuildContext context) {
      return Scaffold(
        appBar: AppBar(
          title: Text('Home'),
          actions: [
            IconButton(
              onPressed: () => handleLogout(context),
              icon: Icon(Icons.logout),
            ),
          ],
        ),
        body: Center(
          child: Column(
            mainAxisAlignment: MainAxisAlignment.center,
            crossAxisAlignment: CrossAxisAlignment.center,
            children: [
              Text('Welcome, ${user.firstName} ${user.lastName}!'),
              SizedBox(height: 16.0),
              CircleAvatar(
                radius: 80.0,
                backgroundImage: NetworkImage(user.image),
              ),
              SizedBox(height: 16.0),
              Text('Email: ${user.email}'),
              Text('Phone: ${user.phone}'),
              Text('Username: ${user.username}'),
            ],
          ),
        ),
      );
    }
  }
6. Open the main.dart file then replace its contents with the script below.
  import 'package:flutter/material.dart';
  import 'login_page.dart';

  void main() {
    runApp(MaterialApp(
      title: 'Login App',
      home: LoginPage(),
    ));
  }
We have done all the steps, now we can test it using the emultor. If successful, the display will look like the image below.
You can improvise by beautifying the login display or combining this exercise with other flutter exercises. Or you can also create your own api by using a token system as authentication.
OK, that's it for our short tutorial on how to create a login and the process in Flutter. Hopefully this short tutorial helps, if you have any questions, please ask directly in the comments column below. That's all and receive a salary.






0 Comments
Come on ask us and let's discuss together
Emoji