Hello everyone, welcome back at porkaone. On this occasion we will learn how to display API data and display detailed data with a bottom sheet in Flutter. Curious? Let's try the tutorial below.
Bottom Sheet
| Read Another Article ✨ |
| 📰 1. How to Display a Website in Flutter with Webview read more |
| 📰 2. How to Make a Bubble Bottom Bar in Flutter read more |
|
📰 3. How to Install Java Development Kit and Add Variable Path to
ENV read more |
|
📰 4. How to Make Copy Feature in Flutter Apps read more |
Displaying Api Data and Creating a Bottom Sheet in Flutter
2. Open pubspec.yaml then add http: ^0.13.4 for example as in the image below. Then save the file so that the package is automatically downloaded.
3. Create a new file with the name user_view.dart in the lib folder. Then copy and paste the script below.
  import 'package:flutter/material.dart';
  import 'package:http/http.dart' as http;
  import 'dart:convert';

  class UserView extends StatefulWidget {
    @override
    _UserViewState createState() => _UserViewState();
  }

  class _UserViewState extends State<UserView> {

    bool isLoading = true;
    List userList = [];

    @override
    void initState() {
      super.initState();
      fetchData();
    }

    Future<void> fetchData() async {
      var response = await http.get(Uri.parse('https://dummyjson.com/users'));
      // Simulate fetching data from API
      var data = jsonDecode(response.body)['users'];
      userList = data;

      setState(() {
        isLoading = false;
      });
    }

    void _showDetailsSheet(Map<String, dynamic> user, BuildContext context) {
      showModalBottomSheet(
        context: context,
        builder: (BuildContext context) {
          return Container(
            padding: EdgeInsets.all(16.0),
            child: Column(
              crossAxisAlignment: CrossAxisAlignment.start,
              children: [
                Center(
                  child: Text(
                    'Details',
                    style: TextStyle(
                      fontSize: 18.0,
                      fontWeight: FontWeight.bold,
                    ),
                  ),
                ),
                SizedBox(height: 16.0),
                Padding(
                  padding: const EdgeInsets.all(8.0),
                  child: Row(
                    children: [
                      Icon(Icons.person),
                      SizedBox(
                        width: 16,
                      ),
                      Text(user['firstName'] + ' ' + user['lastName'])
                    ],
                  ),
                ),
                Divider(), // add Divider between ListTile
                Padding(
                  padding: const EdgeInsets.all(8.0),
                  child: Row(
                    children: [
                      Icon(Icons.email),
                      SizedBox(
                        width: 16,
                      ),
                      Text(user['email'])
                    ],
                  ),
                ),
                Divider(),
                Padding(
                  padding: const EdgeInsets.all(8.0),
                  child: Row(
                    children: [
                      Icon(Icons.phone),
                      SizedBox(
                        width: 16,
                      ),
                      Text(user['phone'])
                    ],
                  ),
                ),
                Divider(),
                Padding(
                  padding: const EdgeInsets.all(8.0),
                  child: Row(
                    children: [
                      Icon(Icons.cake),
                      SizedBox(
                        width: 16,
                      ),
                      Text(user['birthDate'])
                    ],
                  ),
                ),
                Divider(),
                Padding(
                  padding: const EdgeInsets.all(8.0),
                  child: Row(
                    children: [
                      Icon(Icons.person_sharp),
                      SizedBox(
                        width: 16,
                      ),
                      Text(user['gender'])
                    ],
                  ),
                ),
                Divider(),
                Padding(
                  padding: const EdgeInsets.all(8.0),
                  child: Row(
                    children: [
                      Icon(Icons.house),
                      SizedBox(
                        width: 16,
                      ),
                      Text('Address: ' +
                          user['address']['address'] +
                          '\nCity: ' +
                          user['address']['city'])
                    ],
                  ),
                ),
                Divider(),
              ],
            ),
          );
        },
      );
    }

    @override
    Widget build(BuildContext context) {
      return Scaffold(
        appBar: AppBar(
          title: Text('User List'),
        ),
        body: isLoading
            ? Center(
                child: CircularProgressIndicator(),
              )
            : ListView.builder(
                itemCount: userList.length,
                itemBuilder: (context, index) {
                  var user = userList[index];
                  return Card(
                    child: ListTile(
                      leading: Image.network(
                        user['image'],
                        fit: BoxFit.cover,
                        width: 80,
                        height: 80,
                      ),
                      title: Text(
                        user['firstName'],
                        style: TextStyle(fontWeight: FontWeight.w500),
                      ),
                      subtitle: Column(
                        crossAxisAlignment: CrossAxisAlignment.start,
                        children: [
                          SizedBox(height: 5),
                          Text(user['email']),
                          Text(user['phone']),
                          SizedBox(height: 5),
                        ],
                      ),
                      trailing: IconButton(
                        onPressed: () {
                          _showDetailsSheet(user, context);
                        },
                        icon: Icon(Icons.open_in_new),
                      ),
                    ),
                  );
                },
              ),
      );
    }
}- During initialization, isLoading is set to true, indicating that it is in the process of retrieving data.
- Inside initState(), fetchData() is called to fetch data from the API asynchronously.
- In fetchData(), http.get() is used to perform an HTTP GET request to the URL 'https://dummyjson.com/users'.
- The data received from the API is then decoded using jsonDecode() to get a list of users (userList).
- The isLoading state is changed to false after the data is successfully retrieved from the API.
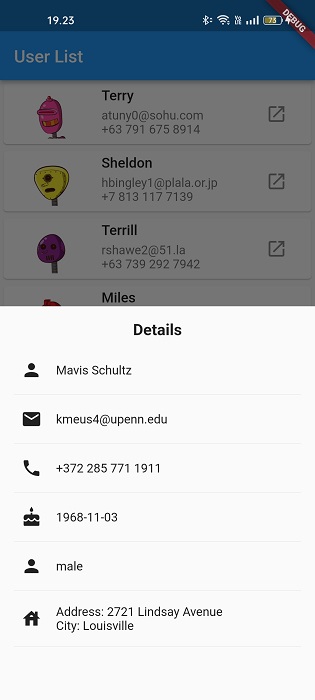
- _showDetailsSheet() is the function used to display the bottom sheet with user details when the open_in_new button is pressed.
- In build(), there is an isLoading condition check to display a loading indicator if the data is still in the process of being retrieved.
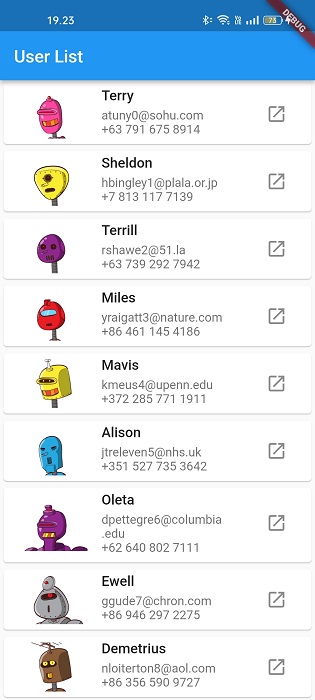
- If the data has been successfully retrieved, ListView.builder() is used to display a list of users in Card form using data from userList.
- When IconButton is pressed, _showDetailsSheet() is called providing user data and BuildContext as parameters.
4. Open the lib/main.dart file. Then replace it with the script below.
  import 'package:flutter/material.dart';
  import 'user_view.dart';

  void main() {
    runApp(MyApp());
  }

  class MyApp extends StatelessWidget {
    @override
    Widget build(BuildContext context) {
      return MaterialApp(
        title: 'Your App Name',
        theme: ThemeData(
          primarySwatch: Colors.blue,
        ),
        home: UserView(),
      );
    }
  }
Ok, now you can do a test run. Please run the emulator. If successful, the display will look like the image below.
That's it for this short tutorial on how to display fire and detailed data with a bottom sheet. Hope it is useful. If you have any questions, please ask in the comments column below. That's all and receive a salary.






0 Comments
Come on ask us and let's discuss together
Emoji