Hello everyone, welcome back at porkaone. On this occasion we will learn how to create custom registration in Laravel quickly and easily. Are you curious? Let's follow the tutorial below.
| Read Another Article ✨ |
| 📰 1. How to Display a Website in Flutter with Webview read more |
| 📰 2. How to Make a Bubble Bottom Bar in Flutter read more |
|
📰 3. How to Install Java Development Kit and Add Variable Path to
ENV read more |
|
📰 4. How to Make Copy Feature in Flutter Apps read more |
How to Create Custom Registration in Laravel
1. Install a new Laravel project. If not, follow the official installation guide at https://laravel.com/docs/installation. I will not explain the installation process in this tutorial. To be faster and straight to the point.
2. Create a new database in MySQL with the name you want, and don't forget to connect to it by changing the .env file settings
3. Go to the project directory then open terminal or CMD. Run the command below to create a new table into the mysql database.
If an error occurs when executing the command above. So make sure steps 1 and 2 are done properly and correctly. We do not discuss how to install and connect to the database in this tutorial, so that the tutorial is lean and straight to the point.
4. Go to the project directory then open terminal or CMD. Run the command below to create AuthController.php in the controllers folder.
5. Next, open app/Http/Controllers/AuthController.php. Then replace it with the script below.
<?php

  namespace App\Http\Controllers;

  use App\Models\User;
  use Illuminate\Support\Facades\Hash;
  use Illuminate\Http\Request;
  use Auth;

  class AuthController extends Controller
  {
      public function processRegister(Request $request)
      {
          $validatedData = $request->validate([
              'name' => 'required|string|max:255',
              'email' => 'required|email|unique:users',
              'password' => 'required|string|min:8|confirmed',
          ]);

          $user = User::create([
              'name' => $validatedData['name'],
              'email' => $validatedData['email'],
              'password' => Hash::make($validatedData['password']),
          ]);

          Auth::login($user); //login process

          return redirect('/home'); //to home page
      }
  }
6. Create a new file with the name register.blade.php in the resources/views folder. Then add the script below.
  <!-- resources/views/register.blade.php -->

  <!DOCTYPE html>
  <html>
  <head>
      <title>Register</title>
      <link rel="stylesheet" href="https://cdnjs.cloudflare.com/ajax/libs/bootstrap/5.3.0/css/bootstrap.min.css">
  </head>
  <body>
      <div class="container">
          <div class="row justify-content-center">
              <div class="col-md-6">
                  <div class="card mt-4">
                      <div class="card-header">Register</div>

                      <div class="card-body">
                          <form method="POST" action="{{ url('process-register') }}">
                              @csrf

                              <div class="mb-3">
                                  <label for="name" class="form-label">Name</label>
                                  <input type="text" id="name" name="name" required autofocus class="form-control">
                              </div>

                              <div class="mb-3">
                                  <label for="email" class="form-label">Email</label>
                                  <input type="email" id="email" name="email" required class="form-control">
                              </div>

                              <div class="mb-3">
                                  <label for="password" class="form-label">Password</label>
                                  <input type="password" id="password" name="password" required class="form-control">
                              </div>

                              <div class="mb-3">
                                  <label for="password_confirmation" class="form-label">Confirm Password</label>
                                  <input type="password" id="password_confirmation" name="password_confirmation" required class="form-control">
                              </div>

                              <div class="mb-3">
                                  <button type="submit" class="btn btn-primary">Register</button>
                              </div>
                          </form>
                      </div>
                  </div>
              </div>
          </div>
      </div>

      <script src="https://cdnjs.cloudflare.com/ajax/libs/bootstrap/5.3.0/js/bootstrap.bundle.min.js"></script>
  </body>
  </html>
7. Create a new file with the name home.blade.php in the resources/views folder. Then add the script below.
  <!-- resources/views/home.blade.php -->

  <!DOCTYPE html>
  <html>
  <head>
      <title>Home</title>
      <link rel="stylesheet" href="https://cdnjs.cloudflare.com/ajax/libs/bootstrap/5.3.0/css/bootstrap.min.css">
  </head>
  <body>
      <div class="container">
          <div class="row justify-content-center">
              <div class="col-md-6">
                  <div class="card mt-5">
                      <div class="card-header">Welcome, {{ Auth::user()->name }}</div>

                      <div class="card-body">
                          <p>Email: {{ Auth::user()->email }}</p>

                          <form action="{{ url('logout') }}" method="POST">
                              @csrf
                              <button type="submit" class="btn btn-danger">Logout</button>
                          </form>
                      </div>
                  </div>
              </div>
          </div>
      </div>

      <script src="https://cdnjs.cloudflare.com/ajax/libs/bootstrap/5.3.0/js/bootstrap.bundle.min.js"></script>
  </body>
  </html>
8. Open routes/web.php then replace it with the script below.
<?php

  use Illuminate\Support\Facades\Route;
  use App\Http\Controllers\AuthController;

  /*
  |--------------------------------------------------------------------------
  | Web Routes
  |--------------------------------------------------------------------------
  |
  | Here is where you can register web routes for your application. These
  | routes are loaded by the RouteServiceProvider within a group which
  | contains the "web" middleware group. Now create something great!
  |
  */

  Route::get('/', function () {
      return view('welcome');
  });

  //to home page
  Route::get('/home', function(){ return view('home'); })->middleware('auth');

  //to register page
  Route::get('/register', function(){ return view('register'); });

  //to process register
  Route::post('/process-register', [AuthController::class, 'processRegister']);

  //logout
  Route::post('/logout', function () {
      Auth::logout();
      return redirect('/login');
  });
9. Go to the project directory then open terminal or CMD. Then run the command below to run the laravel command
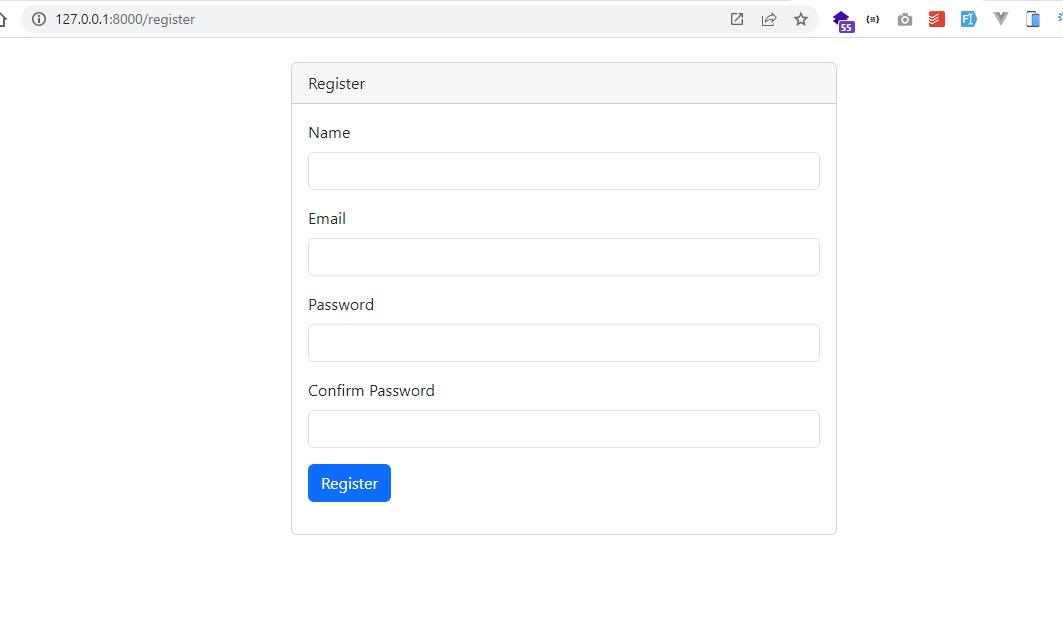
10. Open the browser and type the address http://127.0.0.1:8000/register then fill in the data and click the signup button. If successful, you will be redirected to the home page.

|
| Register Page |

|
| Home Page |
OK, that's it for our short tutorial this time about how to create a custom register in Laravel. Hopefully this short tutorial is useful. If you have any questions, please ask directly in the comments column below. That's all and receive a salary.


0 Comments
Come on ask us and let's discuss together
Emoji