WordPress provides APIs that we can process for various application needs. https://domain.com/wp-json/wp/v2/posts is an endpoint for getting news from a website that uses WordPress. No need for authentication, we can easily process the data. In this tutorial we will create a news application that displays news from the hipwee.com website. Please scroll to the bottom of this article to see the final results.
Creating a News Application with the WordPress API
1. Create a new flutter project with the name you want. Use the latest version of flutter or flutter that supports null safety.
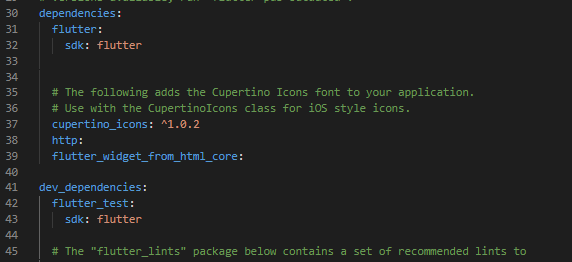
2. Open pubspec.yaml. Then add http: and flutter_widget_from_html_core: as in the example below.
|
| Add Package |
3. Then create a new file in the lib folder with the name news_model.dart as the data model. Follow the script as below.
class News {
  final String title;
  final String content;
  final String imageUrl;

  News({required this.title, required this.content, required this.imageUrl});

  factory News.fromJson(Map<String, dynamic> json) {
    return News(
      title: json['title']['rendered'],
      content: json['content']['rendered'],
      imageUrl: json['featured_media'] != 0
          ? json['_embedded']['wp:featuredmedia'][0]['source_url']
          : '',
    );
  }
}
4. Then create a new file in the lib folder with the name wordpress_api.dart. This file functions to win api data from WordPress. Follow the script below.
  import 'dart:convert';
  import 'package:http/http.dart' as http;

  import 'news_model.dart';

  class WordPressAPI {

    Future<List<News>> fetchNews() async {
      final response = await http.get(Uri.parse('https://hipwee.com/wp-json/wp/v2/posts?_embed'));
      if (response.statusCode == 200) {
        final List<dynamic> jsonResponse = jsonDecode(response.body);
        return jsonResponse.map((data) => News.fromJson(data)).toList();
      } else {
        throw Exception('Failed to load news');
      }
    }
  }
5. Create a new file in the lib folder with the name detail.dart. This file functions to display news details. Follow the script below.
  import 'package:flutter/material.dart';
  import 'package:flutter_widget_from_html_core/flutter_widget_from_html_core.dart';

  class Detail extends StatelessWidget {
    final String title;
    final String content;
    final String image;
    final VoidCallback? onPressed;

    Detail({required this.title, required this.content, required this.image, this.onPressed});

    @override
    Widget build(BuildContext context) {

      //menghilangkan text 'data' pada 'data-src' ini biasa terdapat pada <img>
      String modifiedHtmlString = this.content.replaceAll('data-src', 'src');

      return Scaffold(
        appBar: AppBar(
          title: Text('Detail'),
        ),
        body: ListView(
          padding: EdgeInsets.zero,
          children: [
            Container(
              width: double.infinity,
              height: MediaQuery.of(context).size.height * 0.33,
              decoration: BoxDecoration(
                // color: Colors.grey[400],
                image: DecorationImage(
                  image: NetworkImage(this.image),
                  fit: BoxFit.cover,
                ),
              ),
            ),
            SizedBox(
              height: 10,
            ),
            Padding(
              padding: EdgeInsets.only(left: 16, right: 16, top: 5, bottom: 16),
              child: Column(
                crossAxisAlignment: CrossAxisAlignment.start,
                children: [
                  Text(
                    this.title,
                    style: TextStyle(
                      fontSize: 22,
                      fontWeight: FontWeight.w400,
                    ),
                  ),
                  SizedBox(
                    height: 20,
                  ),
                  HtmlWidget(
                    modifiedHtmlString //html text is converted into readable text
                  ),
                ],
              ),
            )
          ],
        ),
      );
    }
  }
6. Open lib/main.dart than follow the script below
import 'package:flutter/material.dart';
  import 'detail.dart';
  import 'wordpress_api.dart';
  import 'news_model.dart';

  void main() {
    runApp(MyApp());
  }

  class MyApp extends StatelessWidget {
    @override
    Widget build(BuildContext context) {
      return MaterialApp(
        title: 'WordPress News',
        theme: ThemeData(
          primarySwatch: Colors.blue,
        ),
        home: NewsScreen(),
      );
    }
  }

  class NewsScreen extends StatefulWidget {
    @override
    _NewsScreenState createState() => _NewsScreenState();
  }

  class _NewsScreenState extends State<NewsScreen> {
    late Future<List<News>> futureNews;

    @override
    void initState() {
      super.initState();
      futureNews = WordPressAPI().fetchNews();
    }

    @override
    Widget build(BuildContext context) {
      return Scaffold(
        appBar: AppBar(
          title: Text('WordPress News'),
        ),
        body: Center(
          child: FutureBuilder<List<News>>(
            future: futureNews,
            builder: (context, snapshot) {
              if (snapshot.hasData) {
                return ListView.builder(
                  itemCount: snapshot.data!.length,
                  itemBuilder: (context, index) {
                    final news = snapshot.data![index];
                    return ListTile(
                      contentPadding:
                          EdgeInsets.only(top: 16, left: 16, right: 16),
                      title: Text(
                        news.title,
                        maxLines: 2,
                        overflow: TextOverflow.ellipsis,
                      ),
                      leading: news.imageUrl != ''
                          ? Image.network(
                              news.imageUrl,
                              fit: BoxFit.cover,
                              width: 80,
                              height: 80,
                            )
                          : Container(),
                      trailing: IconButton(
                        onPressed: () {
                          Navigator.push(
                            context,
                            // DetailPage is the destination page
                            MaterialPageRoute(
                              builder: (context) => Detail(
                                title: news.title,
                                content: news.content,
                                image: news.imageUrl,
                              ),
                            ),
                          );
                        },
                        icon: Icon(
                          Icons.open_in_new,
                        ),
                      ),
                    );
                  },
                );
              } else if (snapshot.hasError) {
                return Text('${snapshot.error}');
              }
              return CircularProgressIndicator();
            },
          ),
        ),
      );
    }
  }
Now we do a test. Run the emulator. If successful, the display will look like the image below.
It's easy, isn't it? Now you can create a news application with news sourced from WordPress. You can add other news choices by using different website sources. The conditions must be WordPress and the API can be accessed. Also improvise by adding other widgets and state management to your application.
| Read Another Article ✨ |
| 📰 1. How to Create a Select Dropdown with API in Flutter read more |
| 📰 2. How to Create a Select Input Dropdown in Flutter read more |
|
📰 3. How to Make a QR Code Scanner in Flutter
ENV read more |
|
📰 4. How to Display Youtube Videos in Flutter
read more |
That's the tutorial on how to create a news application using the WordPress API. Hopefully this short tutorial is useful. If you have any questions, please ask directly in the comments column below. That's all and receive a salary.





0 Comments
Come on ask us and let's discuss together
Emoji