Halo semuanya, kembali lagi di sahretech. Pada kesempatan kali ini kita akan belajar cara menampilkan postingan blogger di aplikasi flutter. Penasaran?, ayo ikuti tutorialnya di bawah ini.
Just like WordPress, Blogger also provides APIs that we can use for various application needs. Unlike WordPress, Blogger requires authentication to be able to access its API data. But it doesn't matter, because I have prepared a tutorial reference on how to get the api key below.
Previously, I also wrote a tutorial on how to consume WordPress API in Flutter, very easily and quickly. Follow the link below https://www.porkaone.com/2023/12/creating-news-application-with.html. For those of you who don't have blogger or WordPress, just follow the tutorial material I wrote. So you can still learn even though you don't have one yet.
Apart from displaying Blogger API data. We will also use a webview to display all the data. Please scroll to the bottom of this article to see the final results.
| Read Another Article ✨ |
| 📰 1. How to Create a Select Dropdown with API in Flutter read more |
| 📰 2. How to Create a Select Input Dropdown in Flutter read more |
|
📰 3. How to Make a QR Code Scanner in Flutter ENV read more |
|
📰 4. How to Display Youtube Videos in Flutter read more |
How to Create a News Application from the Blogger API in Flutter
1. First, you must have an API key by registering at https://console.cloud.google.com. You can watch a tutorial on how to get an API key at the following link
2. Ok, next create a new flutter project with the name you want. Use the latest version of flutter.
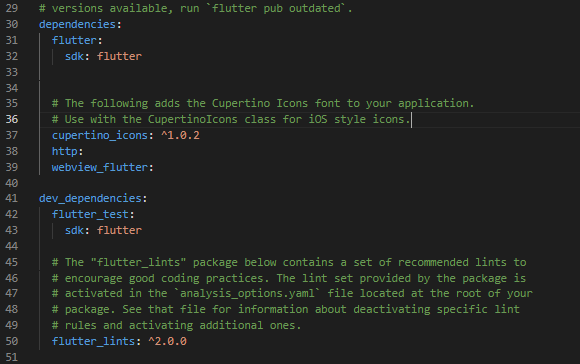
3. Open the pubspec.yaml file then add http: and webview_flutter: follow the example as shown in the image below, and don't forget to save the file to download the package.

|
| Download Package |
4. Create a new file in the lib folder with the name blog_model.dart. Follow the script as below.
class Blog {
  final String title;
  final String content;
  final String url;

  Blog({
    required this.title,
    required this.content,
    required this.url
  });

  factory Blog.fromJson(Map<String, dynamic> json) {
    return Blog(
      title: json['title'],
      content: json['content'],
      url: json['url']
    );
  }
}
5. Buat sebuah file baru di dalam folder lib dengan nama blogger_api.dart. Ikuti scriptnya di bawah ini.
  import 'dart:convert';
  import 'package:http/http.dart' as http;

  import 'blog_model.dart';

  class WordPressAPI {

    Future<List<Blog>> fetchNews() async {

      //isi key dengan google api key kalian masing-masing
      final response = await http.get(Uri.parse('https://www.googleapis.com/blogger/v3/blogs/8111507943178419750/posts?key='));
      if (response.statusCode == 200) {
        final List<dynamic> jsonResponse = jsonDecode(response.body)['items'];
        return jsonResponse.map((data) => Blog.fromJson(data)).toList();
      } else {
        throw Exception('Failed to load blog');
      }
    }
  }
Important explanations to read:
- 8111507943178419750 is the Blogger ID. You can use anyone's Blogger ID, if you don't have a blogger, just use my Blogger ID.
- key= don't forget to fill it in with the Google API key that you got previously.
- The other script doesn't have much explanation, because I've discussed it in another article.
- You can access the URL complete with the key directly in the browser. The results can be seen as below.
6. Create a new file in the lib folder with the name detail.dart. Follow the script below.
  import 'package:flutter/material.dart';
  import 'package:webview_flutter/webview_flutter.dart';

  class Detail extends StatefulWidget {
    final String url;

    Detail({required this.url});

    @override
    State<Detail> createState() => _DetailState();
  }

  class _DetailState extends State<Detail> {
    @override
    Widget build(BuildContext context) {

      //must use http, if you use https then the data cannot be displayed
      final String modifiedUrl =
          this.widget.url.replaceFirst('http://', 'https://');

      final controller = WebViewController()
        ..setJavaScriptMode(JavaScriptMode.unrestricted) //turn on javascript
        ..loadRequest(Uri.parse(modifiedUrl)); //load the destination url

      return Scaffold(
        appBar: AppBar(
          title: Text('Detail'),
        ),
        body: WebViewWidget(
          controller: controller,
        ),
      );
    }
  }
7. Open lib/main.dart. Replace with the script below.
import 'package:flutter/material.dart';
  import 'blogger_api.dart';
  import 'blog_model.dart';
  import 'detail.dart';

  void main() {
    runApp(MyApp());
  }

  class MyApp extends StatelessWidget {
    @override
    Widget build(BuildContext context) {
      return MaterialApp(
        title: 'Blogger API News',
        theme: ThemeData(
          primarySwatch: Colors.blue,
        ),
        home: BlogScreen(),
      );
    }
  }

  class BlogScreen extends StatefulWidget {
    @override
    _BlogScreenState createState() => _BlogScreenState();
  }

  class _BlogScreenState extends State<BlogScreen> {
    late Future<List<Blog>> futureNews;

    @override
    void initState() {
      super.initState();
      futureNews = WordPressAPI().fetchNews();
    }

    @override
    Widget build(BuildContext context) {
      return Scaffold(
        appBar: AppBar(
          title: Text('WordPress News'),
        ),
        body: Center(
          child: FutureBuilder<List<Blog>>(
            future: futureNews,
            builder: (context, snapshot) {
              if (snapshot.hasData) {
                return ListView.builder(
                  itemCount: snapshot.data!.length,
                  itemBuilder: (context, index) {
                    final news = snapshot.data![index];

                    //in blogger, main image from content
                    //so we need to separate the image from its content

                    var content = news.content;
                    var regex = RegExp(r'src=\"(https:\/\/blogger\.googleusercontent\.com\/img\/[^\"]+)\"');
                    var match = regex.firstMatch(content);
                    var image = match != null
                        ? match.group(1)
                        : 'https://cdn.pixabay.com/photo/2017/09/25/14/23/mountains-2785261_960_720.jpg';

                    return ListTile(
                      contentPadding:
                          EdgeInsets.only(top: 16, left: 16, right: 16),
                      title: Text(
                        news.title,
                        maxLines: 3,
                        overflow: TextOverflow.ellipsis,
                        style: TextStyle(fontSize: 14),
                      ),
                      leading: Image.network(
                        image!,
                        fit: BoxFit.cover,
                        width: 100,
                      ),
                      trailing: IconButton(
                        onPressed: () {
                          Navigator.push(
                              context,

                              MaterialPageRoute(
                                builder: (context) => Detail(
                                  url: news.url
                                ),
                              ),
                            );
                        },
                        icon: Icon(
                          Icons.open_in_new,
                        ),
                      ),
                    );
                  },
                );
              } else if (snapshot.hasError) {
                return Text('${snapshot.error}');
              }
              return CircularProgressIndicator();
            },
          ),
        ),
      );
    }
  }
Now we can do a test run. Please run the emulator. If successful, the display will look more or less like the image below.
That's the tutorial on how to create a news application from Blogger Api in Flutter. Hopefully this short tutorial is useful. If there are any problems, please write in the comments column below. That's all and receive a salary.


0 Comments
Come on ask us and let's discuss together
Emoji