Previously I wrote a tutorial on how to add new columns to existing tables in Laravel via migration, click the following link to read. #link
On this occasion, we will edit or change the table structure that has been
migrated to Laravel. If there are still few tables, you can use the
php artisan migrate:rollback
command to re-edit the migration file with errors.
But if the project you are working on is getting bigger and has lots of tables
in it, and it turns out that you have to fix one of the tables that already
existed, then using the method I mentioned above is not a solution.
To fix this error we can use the doctrine/dbal library. This library is
very easy to use, and the history of table changes is also recorded. How to
use it?, Follow the details below.
How to Edit Migrated Table Structure in Laravel
1. To make this tutorial simple and easy to understand, I will use the example of the existing users table in Laravel. Please migrate first by running the command below.
php artisan migrate
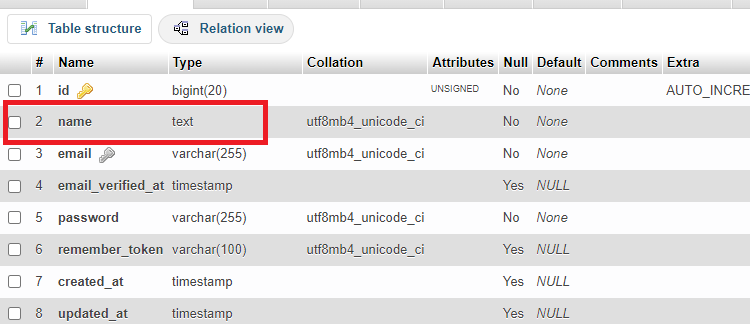
2. Below is an example of the user table that we have migrated.
But it turns out there is an error and we need to change the type in the name
field from varchar to text.
3. Please run the command below to download the required
library. And make sure you are in the Laravel project directory first. Then
wait until the download process is complete.
composer require doctrine/dbal
4. Run the command below to create a new migration file.
edit_column_to_users_table is the name for the migration file. You
can make the file name according to your wishes.
php artisan make:migration edit_column_to_users_table --table=users
5. Next open the migration file that we just created before
and edit the file like the script below.
<?php

  use Illuminate\Database\Migrations\Migration;
  use Illuminate\Database\Schema\Blueprint;
  use Illuminate\Support\Facades\Schema;

  class EditColumnToUsersTable extends Migration
  {
      /**
       * Run the migrations.
       *
       * @return void
       */
      public function up()
      {
          Schema::table('users', function (Blueprint $table) {
              $table->text('name')->change();
          });
      }

      /**
       * Reverse the migrations.
       *
       * @return void
       */
      public function down()
      {
          Schema::table('users', function (Blueprint $table) {
              //
          });
      }
  }
6. Ok, we have done all the steps. It's time to migrate by
running the command below.
7. If it works and there are no errors. Then you can see changes in the users table as shown below.
Ok, that's all for our tutorial this time about how to edit or change existing tables in Laravel with migration. Hopefully this short tutorial is useful and can be implemented. If you have questions, please ask directly in the comments column below. That is all and thank you.
php artisan migrate
7. If it works and there are no errors. Then you can see changes in the users table as shown below.

|
| Hasil Akhir |
Ok, that's all for our tutorial this time about how to edit or change existing tables in Laravel with migration. Hopefully this short tutorial is useful and can be implemented. If you have questions, please ask directly in the comments column below. That is all and thank you.


0 Comments
Come on ask us and let's discuss together
Emoji