How to Make Activity Log Without a Plugin in Laravel
1. Prepare a new or existing Laravel project, it is recommended to use the latest version of Laravel. The use of models, routes, controllers and views will not be explained here. This is intended to speed up writing and make it easier for readers to get straight to the point of discussion.2. Don't forget to make settings in the .env file. Please adjust to the database that you use respectively.
3. Run the following command to create migration. php artisan make:migration create_log_activity_table. Then follow as below, then run the command php artisan migrate to create tables inside phpmyadmin
  <?php

  use Illuminate\Database\Migrations\Migration;
  use Illuminate\Database\Schema\Blueprint;
  use Illuminate\Support\Facades\Schema;

  class CreateLogActivitiesTable extends Migration
  {
      /**
       * Run the migrations.
       *
       * @return void
       */
      public function up()
      {
          Schema::create('log_activities', function (Blueprint $table) {
              $table->id();
              $table->string('subject');
              $table->string('url');
              $table->string('method');
              $table->string('agent')->nullable();
              $table->string('user_id')->nullable();
              $table->timestamps();
          });
      }

      /**
       * Reverse the migrations.
       *
       * @return void
       */
      public function down()
      {
          Schema::dropIfExists('log_activities');
      }
  }
4. Create a model named LogActivity.php by running the
following command php artisan make:model LogActivity. Then follow the script as follows
  <?php

  namespace App\Models;

  use Illuminate\Database\Eloquent\Factories\HasFactory;
  use Illuminate\Database\Eloquent\Model;

  class LogActivity extends Model
  {
      use HasFactory;

      //the script below is added if
      //doesn't follow laravel's naming convention
      protected $table = 'log_activities';

      protected $guarded = ['id'];
  }
  <?php


  namespace App\Helpers;
  use Request;
  use App\Models\LogActivity as LogActivityModel;


  class LogActivity
  {


      public static function addToLog($subject)
      {
        $log = [];
        $log['subject'] = $subject;
        $log['url'] = Request::fullUrl();
        $log['method'] = Request::method();
        $log['agent'] = Request::header('user-agent');
        $log['user_id'] = auth()->check() ? auth()->user()->id : 1;
        LogActivityModel::create($log);
      }


      public static function logActivityLists()
      {
        return LogActivityModel::latest()->get();
      }


  }
  ....

  'aliases' => [

    ....

    'LogActivity' => App\Helpers\LogActivity::class,

  ]
7. Create two new routes in the web.php file, as shown below
  Route::get('add-to-log', 'App\Http\Controllers\LogActivityController@myTestAddToLog');
  Route::get('log-activity', 'App\Http\Controllers\LogActivityController@logActivity');
8. Create a new controller by running the following command php artisan make:controller LogActivityController then follow the script as follows
<?php

  namespace App\Http\Controllers;

  use Illuminate\Http\Request;

  class LogActivityController extends Controller
  {
      public function myTestAddToLog()
      {

          //you can do anything
          //like create, read, update and delete before the log function below is executed

          \LogActivity::addToLog('My Testing Add To Log.');
          dd('log insert successfully.');
      }


      /**
       * Show the application dashboard.
       *
       * @return \Illuminate\Http\Response
       */
      public function logActivity()
      {

          //you can do anything
          //like create, read, update and delete before the log function below is executed

          $logs = \LogActivity::logActivityLists();
          return view('log_activity', compact('logs'));
      }
  }
9. Create a view file to list the activity logs that have been
saved with the name log_activity.blade.php. Then follow the script
like the script below.
<!DOCTYPE html>
  <html>
  <head>
    <title>Log Activity Lists</title>
    <link rel="stylesheet" href="https://cdnjs.cloudflare.com/ajax/libs/twitter-bootstrap/3.3.7/css/bootstrap.min.css" />
  </head>
  <body>


  <div class="container">
    <h1>Log Activity Lists</h1>
    <table class="table table-bordered">
      <tr>
        <th>No</th>
        <th>Subject</th>
        <th>URL</th>
        <th>Method</th>
        <th width="300px">User Agent</th>
        <th>User Id</th>
        <th>Action</th>
      </tr>
      @if($logs->count())
        @foreach($logs as $key => $log)
        <tr>
          <td>{{ ++$key }}</td>
          <td>{{ $log->subject }}</td>
          <td class="text-success">{{ $log->url }}</td>
          <td><label class="label label-info">{{ $log->method }}</label></td>
          <td class="text-danger">{{ $log->agent }}</td>
          <td>{{ $log->user_id }}</td>
          <td><button class="btn btn-danger btn-sm">Delete</button></td>
        </tr>
        @endforeach
      @endif
    </table>
  </div>


  </body>
  </html>
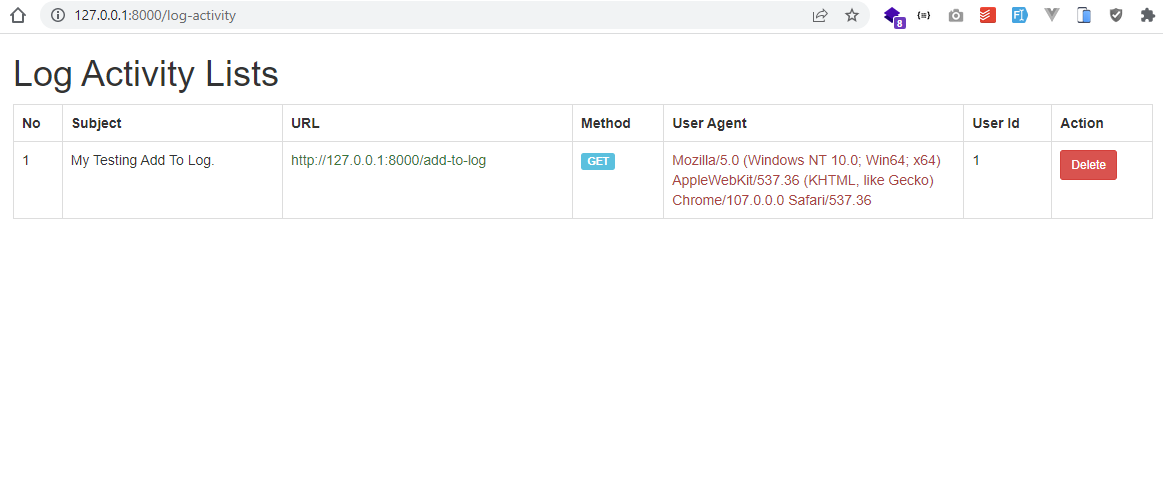
Ok, we have done all the steps. Then we can do a test run. Run php artisan serve. Then open route localhost:8000/add-to-log to add a new
log, and open route localhost:8000/log-activity to view saved logs.

|
| Final Result |
Is this tutorial easy enough and helps you? Now you can implement this tutorial in the real project that you are working on. Implementing it on an existing project is very easy. All you have to do is add LogActivity::addToLog('your log activity');. In each existing function controller.
If there are problems with the tutorial above, please ask directly in the
comments column or the sahretech fanspage. That's all for this tutorial
about how to save user activity logs in Laravel without a plugin.
Hopefully useful, that's all and thank you.


0 Comments
Come on ask us and let's discuss together
Emoji