Hello everyone, back again at porkaone. So on this occasion we will learn
state management using getx. Curious?, let's follow the discussion below.
State Management
Sate Management is a way or method to manage state or data in an
application. We will call this state or we will change it on every page that
we will use without re-rendering the whole page.
Before using state management. Flutter users who are just learning will use
stateful widgets to change state or data. The use of stateful widgets is
ineffective and burdensome for the application. The reason is because the
page is re-rendered, meaning that all components on the page are reloaded
only to retrieve one or part of the data.
Well, so that the application you build is more efficient and effective, of
course you need to use state management. For flutter developers, this is
mandatory to learn.
Case Study Making Product Cart
In this tutorial we will learn how to implement state management using the
get library. The application to be made is quite simple. Where there is a
home page that displays 2 products, each product has a plus and minus
button. This button will run state management to change certain state or
data. Then there is a check total button to see the total selected product.
Please scroll this page at the bottom to see the results.
How to Use State Management Flutter with GetX
1. create a new flutter project with the name cart_product. Here I have also used the null safety version of Flutter.
2. Open the pubspec.yaml file. Then add the
http: package as shown below. Then save the page to download the
package.
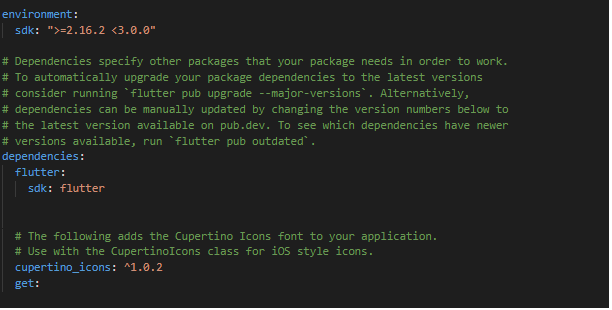
|
| pubspec.yaml |
3. Open the lib/main.dart file and replace its contents
with the script below.
    import 'home.dart';
    import 'package:flutter/material.dart';

    void main() {
      runApp(const MyApp());
    }

    class MyApp extends StatelessWidget {
      const MyApp({Key? key}) : super(key: key);

      // This widget is the root of your application.
      @override
      Widget build(BuildContext context) {
        return MaterialApp(
          title: 'Flutter Demo',
          debugShowCheckedModeBanner: false,
          home: Scaffold(
            appBar: AppBar(
              title: Text("List Product"),
            ),
            body: Home(),
          ),
        );
      }
    }
4. Create a home.dart file in the lib folder then follow
the script as below. I have written a brief explanation in the script below.
import 'controller.dart';
import 'total_page.dart';
import 'package:flutter/material.dart';
import 'package:get/get.dart';
//when using state management we don't need to use stateful anymore
class Home extends StatelessWidget {
//initialize
final Controller c = Get.put(Controller());
@override
Widget build(BuildContext context) {
return Scaffold(
body: Padding(
padding: const EdgeInsets.all(15),
child: Column(
mainAxisAlignment: MainAxisAlignment.center,
children: [
Row(
mainAxisAlignment: MainAxisAlignment.spaceAround,
children: [
Container(
width: 80,
height: 80,
decoration: BoxDecoration(
borderRadius: BorderRadius.circular(15),
image: DecorationImage(
image: NetworkImage(
'https://cdn.pixabay.com/photo/2011/03/16/16/01/tomatoes-5356__340.jpg',
),
fit: BoxFit.cover,
),
),
),
Row(
children: [
GestureDetector(
onTap: () => {
//when tapped, the tomato variable will increase
//addTomato() function can be seen in controller.dart . file
c.addTomato(),
},
child: Container(
width: 45,
height: 45,
decoration: BoxDecoration(
borderRadius: BorderRadius.circular(15),
color: Colors.black12,
),
child: Icon(Icons.add),
),
),
SizedBox(
width: 10,
),
//the tomato variable will reactively increase or decrease when the + or - button is tapped
//needs to be wrapped in Obx() so that the variables in it can change reactively
Obx(
() => Text(
"${c.tomato.toString()}",
style: TextStyle(
fontSize: 15,
),
),
),
SizedBox(
width: 10,
),
GestureDetector(
onTap: () => {
//when tapped, the tomato variable will decrease
//the removeTomato() function can be seen in the controller.dart file
c.removeTomato(),
},
child: Container(
width: 45,
height: 45,
decoration: BoxDecoration(
borderRadius: BorderRadius.circular(15),
color: Colors.black12,
),
child: Icon(Icons.remove),
),
),
],
)
],
),
SizedBox(
height: 20,
),
Row(
mainAxisAlignment: MainAxisAlignment.spaceAround,
children: [
Container(
width: 80,
height: 80,
decoration: BoxDecoration(
borderRadius: BorderRadius.circular(15),
image: DecorationImage(
image: NetworkImage(
'https://cdn.pixabay.com/photo/2018/10/03/21/57/cabbage-3722498_960_720.jpg',
),
fit: BoxFit.cover,
),
),
),
Row(
children: [
GestureDetector(
//when tapped, the cabbage variable will increase
//the addCabbage() function can be seen in the controller.dart file
onTap: () => c.addCabbage(),
child: Container(
width: 45,
height: 45,
decoration: BoxDecoration(
borderRadius: BorderRadius.circular(15),
color: Colors.black12,
),
child: Icon(Icons.add),
),
),
SizedBox(
width: 10,
),
//the cabbage variable will reactively increase or decrease when the + or - button is tapped
//needs to be wrapped in Obx() so that the variables in it can change reactively
Obx(
() => Text(
"${c.cabbage.toString()}",
style: TextStyle(
fontSize: 15,
),
),
),
SizedBox(
width: 10,
),
GestureDetector(
//when tapped, the cabbage variable will decrease
//the removeCabbage() function can be seen in the controller.dart file
onTap: () => c.removeCabbage(),
child: Container(
width: 45,
height: 45,
decoration: BoxDecoration(
borderRadius: BorderRadius.circular(15),
color: Colors.black12,
),
child: Icon(Icons.remove),
),
),
],
)
],
),
SizedBox(
height: 25,
),
GestureDetector(
onTap: () {
Navigator.push(
context,
// TotalPage is the page to go
MaterialPageRoute(
builder: (context) => TotalPage(),
),
);
},
child: Container(
margin: EdgeInsets.symmetric(horizontal: 40),
height: 50,
width: MediaQuery.of(context).size.width,
decoration: BoxDecoration(
borderRadius: BorderRadius.circular(15),
color: Colors.blue,
),
child: Center(
child: Text(
"Check Total",
style: TextStyle(
fontSize: 20,
color: Colors.white,
),
),
),
),
)
],
),
),
);
}
}
5. Create a controller.dart file in the lib folder then follow the script as below.
        import 'package:get/get.dart';

        class Controller extends GetxController {
          //initialization of required variables
          var tomato = 0.obs;
          var cabbage = 0.obs;

          //function to increase the number of tomatoes
          addTomato() {
            return tomato.value++;
          }

          //function to reduce the number of tomatoes
          removeTomato() {
            if (tomato.value > 0) {
              return tomato.value--;
            }
          }

          //function to increase the number of cabbage
          addCabbage() {
            return cabbage.value++;
          }

          //function to reduce the number of cabbage
          removeCabbage() {
            if (cabbage.value > 0) {
              return cabbage.value--;
            }
          }

          //function to count the number of tomatoes and cabbage
          sumTotal() {
            return tomato.value + cabbage.value;
          }
        }
6. Create a file total_page.dart in the lib folder and then follow the script as below.
        import 'package:flutter/material.dart';
        import 'package:get/get.dart';

        import 'controller.dart';

        class TotalPage extends StatelessWidget {

          //inisialize
          final Controller c = Get.put(Controller());

          @override
          Widget build(BuildContext context) {
            return Scaffold(
              appBar: AppBar(
                title: Text("Total Product"),
              ),
              body: Center(
                child: Column(
                  mainAxisAlignment: MainAxisAlignment.center,
                  // ignore: prefer_const_literals_to_create_immutables
                  children: [
                    Text(
                      "Total Product",
                      style: TextStyle(fontSize: 25),
                    ),
                    Text(
                      //take the calculation results from tomatoes and cabbage
                      c.sumTotal().toString(),
                      style: TextStyle(
                        fontSize: 30,
                      ),
                    ),
                  ],
                ),
              ),
            );
          }
        }
We've gone through all the steps, it's time to try it out. Please run the application. If successful, it will look like the image below.
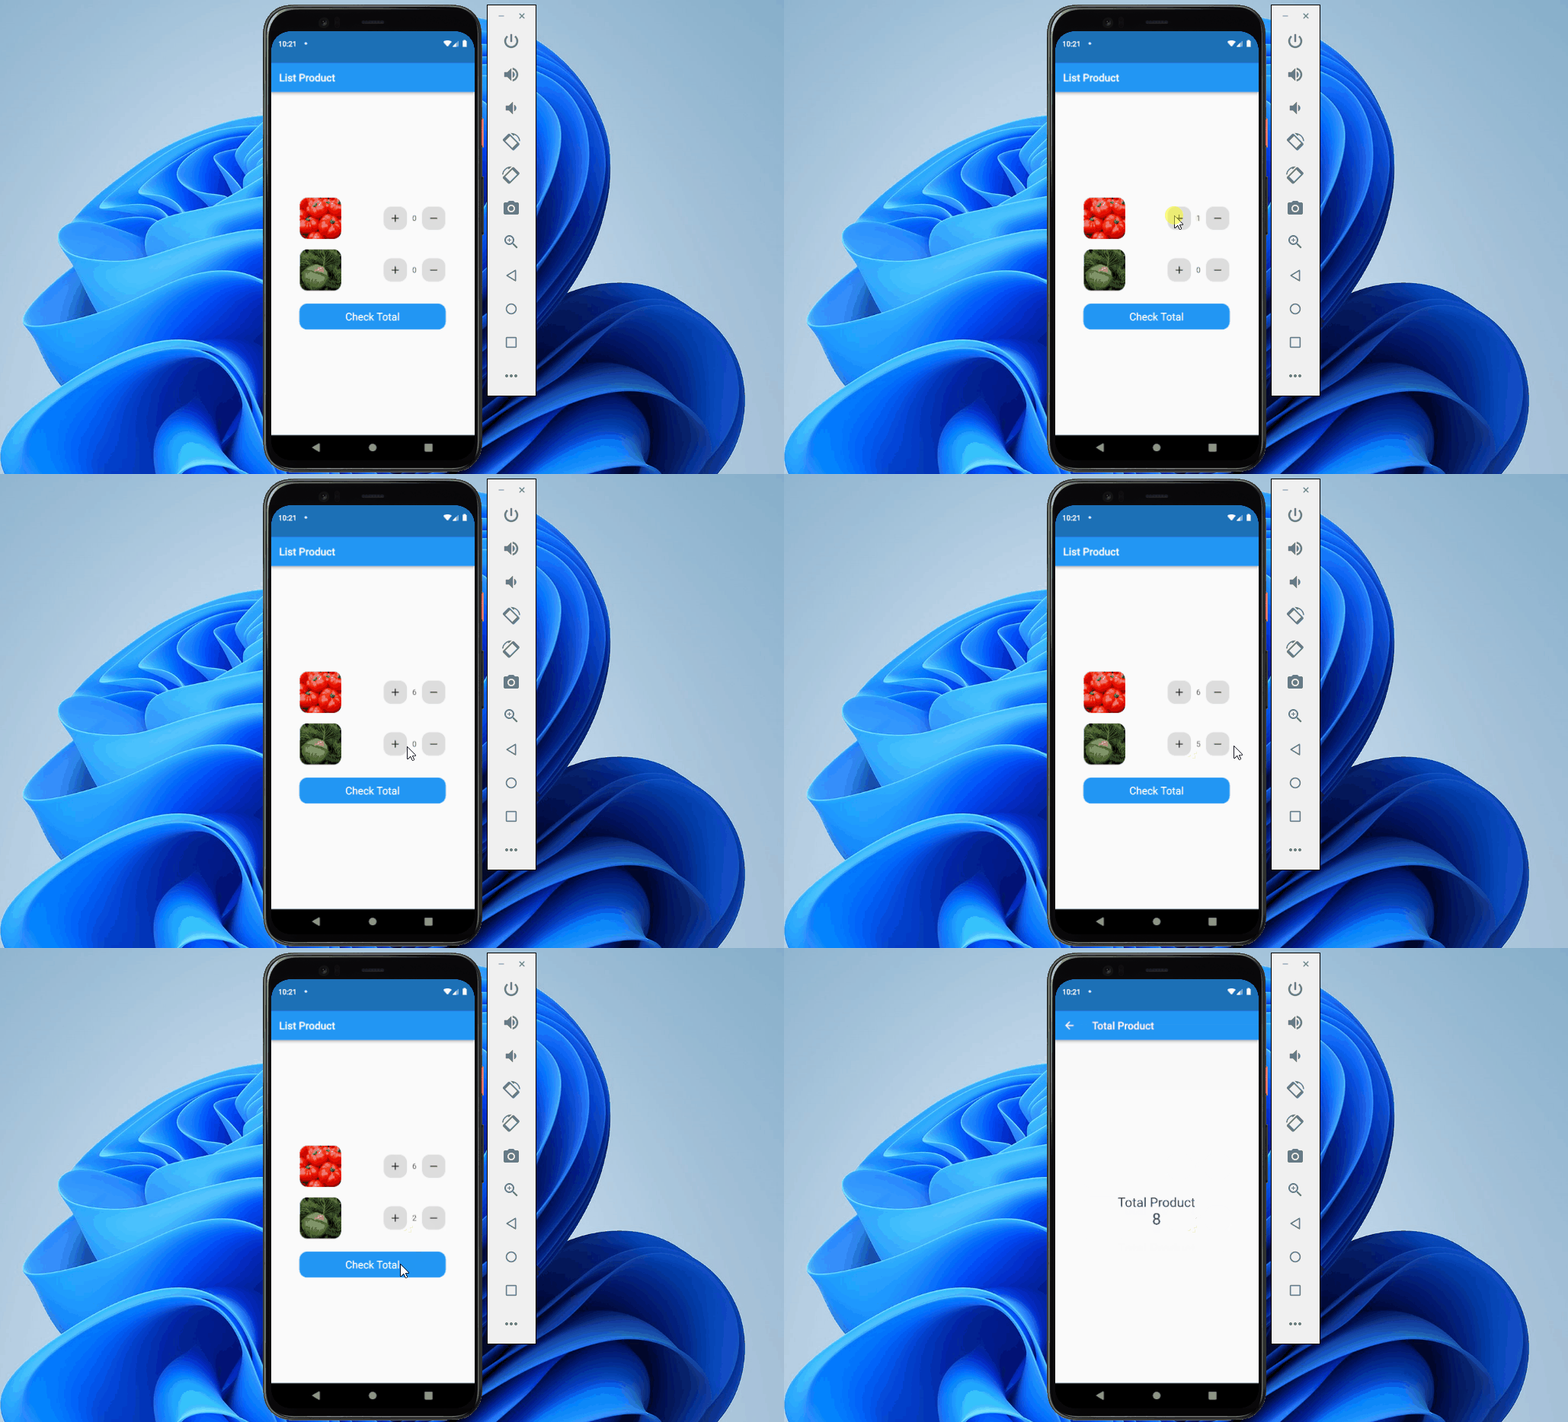
|
| Final Result |
How about it, easy or hard? Now you can use state management by using the getx library. You can improvise and improve by creating more complex applications using this library.
Ok, that's it for this flutter tutorial on how to use flutter state management with getx. May be useful. If there are difficulties, immediately ask in the comments column. That is all and thank you.





0 Comments
Come on ask us and let's discuss together
Emoji