Hello everyone, welcome back at porkaone. On this occasion we will learn how to create CRUD using Firebase and Flutter. Are you curious? Come on, follow the tutorial below.
Firebase is a service from Google that provides online storage or database. Not only online storage, Firebase also has other services such as push notifications, real-time storage, file storage, testing and so on. Firebase can be a solution that can be used if you are lazy or can't create a backend and environment.
On this occasion we will learn how to create a task CRUD application using Firebase. The form is quite simple, namely the title and description of the task. Scroll to the bottom of this article to see the final results.
| Read Another Article ✨ |
| 📰 1. How to Create a Select Dropdown with API in Flutter read more |
| 📰 2. How to Create a Select Input Dropdown in Flutter read more |
|
📰 3. How to Make a QR Code Scanner in Flutter ENV read more |
|
📰 4. How to Display Youtube Videos in Flutter read more |
How to Create a CRUD App with Firebase in Flutter
2. Use the latest flutter version. Meanwhile, the version I use is Flutter version 2.10. And sdk: ">=2.16.2 <3.0.0", minSdkVersion 19 and using multiDex. Here are the pubspec.yaml and android/app/build.gradle settings that I have.

|
| pubspec.yaml |

|
| android/app/build.gradle |
3. Create a new file in the lib folder with the name task_model.dart Follow the script below.
class Task {
  final String id;
  final String title;
  final String description;

  Task({
    required this.id,
    required this.title,
    required this.description,
  });
}
4. Create a new file in the lib folder with the name database.dart. Follow the script below.
  import 'package:cloud_firestore/cloud_firestore.dart';

  import 'task_model.dart';

  class DatabaseService {
    final CollectionReference tasksCollection =
        FirebaseFirestore.instance.collection('tasks'); //inisialisasi database tasks
    //metode untuk menambah data
    Future<void> addTask(String title, String description) async {
      try {
        await tasksCollection.add({
          'title': title,
          'description': description,
        });
      } catch (e) {
        print(e.toString());
      }
    }
    //metode untuk menampilkan gambar
    Stream<List<Task>> getTasks() {
      return tasksCollection.snapshots().map(
        (snapshot) {
          if (snapshot.docs.isEmpty) {
            return [];
          } else {

            return snapshot.docs
                .map(
                  (doc) => Task(
                    id: doc.id,
                    title: (doc.data() as Map<String, dynamic>)['title'] ?? '',
                    description:
                        (doc.data() as Map<String, dynamic>)['description'] ?? '',
                  ),
                )
                .toList();
          }
        },
      );
    }
    //metode untuk mengapus data
    Future<void> deleteTask(String id) async {
      try {
        await tasksCollection.doc(id).delete();
      } catch (e) {
        print(e.toString());
      }
    }
  }
Explanation of the script above:
- final CollectionReference tasksCollection = FirebaseFirestore.instance.collection('tasks'); serves to initialize the tasksCollection variable as a reference to the 'tasks' collection in Firestore. Or it's easier to initialize the database.
- tasksCollection.add() is used to add a new document to the Firestore collection referenced by tasksCollection.
- tasksCollection.doc(id).delete() is used to delete documents based on the document id in the Firestore collection referenced by tasksCollection.
- tasksCollection.snapshots().map() is used to take the most recent snapshot of the Firestore collection referenced by tasksCollection and map each snapshot to the desired data type.
- Stream<List<Task>> is a data type that can be used in realtime. Please try entering data directly into Firebase. Then the data in the application is automatically updated
5. Create a new file in the lib folder with the name task_screen.dart Follow the script below.
import 'package:flutter/material.dart';
  import 'database.dart';
  import 'task_model.dart';

  class TaskScreen extends StatelessWidget {
    final DatabaseService databaseService = DatabaseService();

    @override
    Widget build(BuildContext context) {
      return Scaffold(
        appBar: AppBar(
          title: Text('Task Manager'),
        ),
        body: StreamBuilder<List<Task>>(
          stream: databaseService.getTasks(),
          builder: (context, snapshot) {
            if (!snapshot.hasData) {
              return Center(
                child: CircularProgressIndicator(),
              );
            }

            List<Task> tasks = snapshot.data!;

            return ListView.builder(
              itemCount: tasks.length,
              itemBuilder: (context, index) {
                return ListTile(
                  title: Text(tasks[index].title),
                  subtitle: Text(tasks[index].description),
                  trailing: IconButton(
                    icon: Icon(Icons.delete),
                    onPressed: () {
                      databaseService.deleteTask(tasks[index].id);
                    },
                  ),
                );
              },
            );
          },
        ),
        floatingActionButton: FloatingActionButton(
          child: Icon(Icons.add),
          onPressed: () {
            // Display a dialog for adding a new task
            showDialog(
              context: context,
              builder: (context) {
                String title = '';
                String description = '';

                return AlertDialog(
                  title: Text('Add Task'),
                  content: Column(
                    mainAxisSize: MainAxisSize.min,
                    children: [
                      TextField(
                        onChanged: (value) {
                          title = value;
                        },
                        decoration: InputDecoration(
                          labelText: 'Title',
                        ),
                      ),
                      TextField(
                        onChanged: (value) {
                          description = value;
                        },
                        decoration: InputDecoration(
                          labelText: 'Description',
                        ),
                      ),
                    ],
                  ),
                  actions: [
                    TextButton(
                      child: Text('Cancel'),
                      onPressed: () {
                        Navigator.of(context).pop();
                      },
                    ),
                    TextButton(
                      child: Text('Add'),
                      onPressed: () {
                        databaseService.addTask(title, description);
                        Navigator.of(context).pop();
                      },
                    ),
                  ],
                );
              },
            );
          },
        ),
      );
    }
  }
6. Open the lib/main.dart file and replace it with the script below
  import 'package:firebase_core/firebase_core.dart';
  import 'package:flutter/material.dart';
  import 'firebase_options.dart';
  import 'task_screen.dart';


  void main() async {
    WidgetsFlutterBinding.ensureInitialized();
    await Firebase.initializeApp(
      options: DefaultFirebaseOptions.currentPlatform,
    );

    runApp(MyApp());
  }

  class MyApp extends StatelessWidget {
    @override
    Widget build(BuildContext context) {
      return MaterialApp(
        title: 'Flutter Firebase CRUD',
        theme: ThemeData(
          primarySwatch: Colors.blue,
        ),
        home: TaskScreen(),
      );
    }
  }
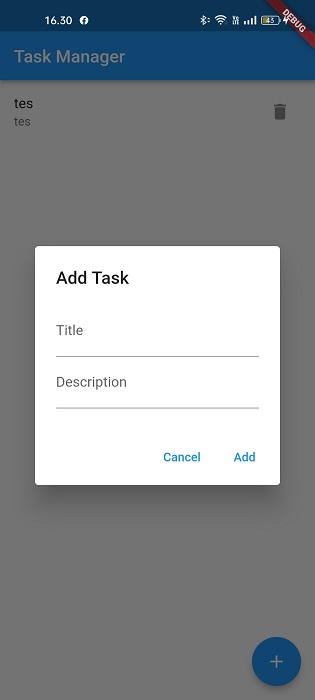
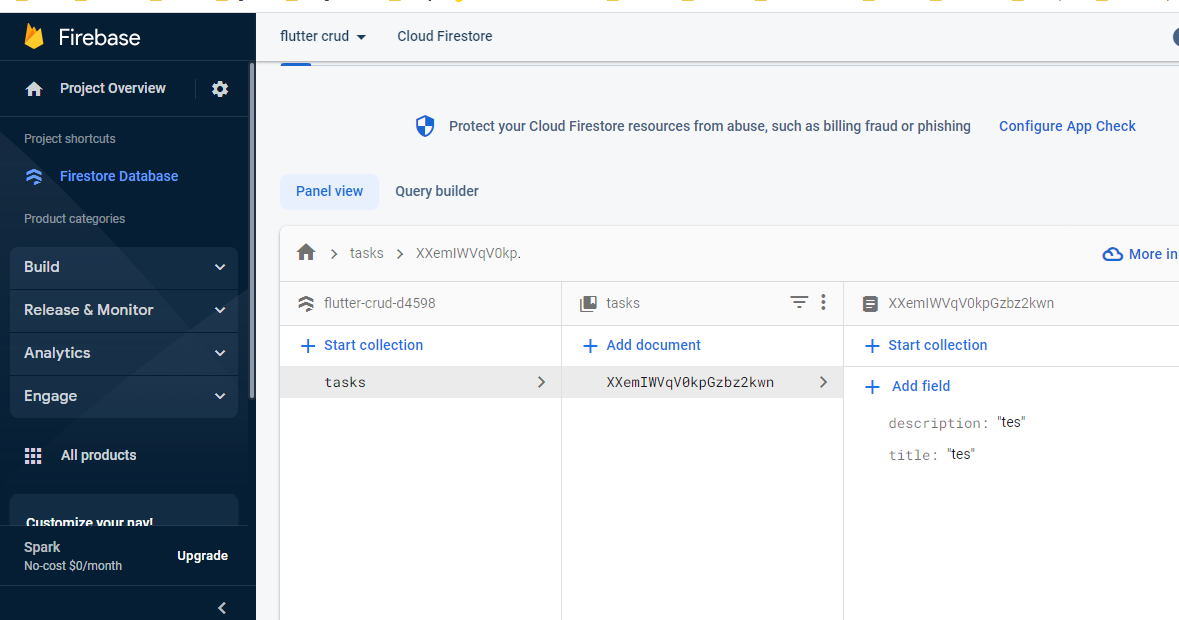
We have done all the steps. Now we can test with the emulator. If successful, the display will look like the image below.
|
| Task Screen |
|
| Firebase |
That's the tutorial on how to create a Firebase CRUD application in Flutter. Hopefully this short tutorial is useful, if you have any questions, please ask directly in the comments column below. That's all and receive a salary.




0 Comments
Come on ask us and let's discuss together
Emoji