Hello everyone, welcome back at porkaone. On this occasion we will learn how to tidy up our Flutter project with the MVC concept. Not only that, we will also learn how to retrieve fire data. Are you curious? Come on, follow the tutorial below.
MVC
MVC stands for M(model), V(view), and C(controller). The model represents the structure of the stored data, the view represents the appearance in an application, the controller represents the logic or process in an application.
This concept makes it easier for programmers to maintain the applications they create, they are easier to read, repair, can be developed in parallel and scripts created on one page are not too long, because the logic, data structure and appearance are created separately.
What Will You Learn?
In our tutorial this time, we will learn how to create a simple flutter application that uses the MVC design in its folder structure. Apart from that, we will also learn how to get API data from the internet and display it in the application. Regarding fire, I have written several articles that you can read
| Read Another Article ✨ |
| 📰 1. Flutter's Cool Vertical and Horizontal ListView Views read more |
| 📰 2.Cool Grid View Page Display in Flutter read more |
|
📰 3. Beautiful Chat Design Display Flutter Starter Template read more |
|
📰 4. Cool List Page Display in Flutter read more |
How to Create MVC and Get Data Api in Flutter
1. Create a new flutter project with the name flutter_mvc_app.
2. Open the pubspec.yaml file and add http: ^0.13.4 as shown below.
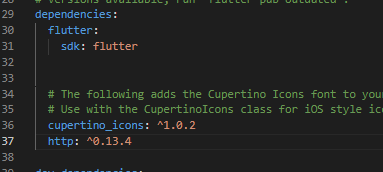
|
| Add Package |
2. Create a new folder with the name models in the lib folder. Then create a file with the name product_model.dart in the models folder then fill it with the script below.
class Product {
  final String title;
  final String category;
  final double price;
  final String thumbnail;

  Product({required this.title, required this.category, required this.price, required this.thumbnail});

  factory Product.fromJson(Map<String, dynamic> json) {
    return Product(
      title: json['title'],
      category: json['category'],
      price: json['price'].toDouble(),
      thumbnail: json['thumbnail'],
    );
  }
}
3. Create a new folder with the name controllers in the lib folder. Then create a file with the name product_controller.dart in the controllers folder then fill it with the script below.
  import 'dart:convert';
  import 'package:http/http.dart' as http;
  import '../models/product.dart';

  // Create a ProductController class
  class ProductController {
    // Define a list to store the products
    List<Product> products = [];

    // Define a method to fetch the products asynchronously
    Future fetchProducts() async {
      // Send an HTTP GET request to the API endpoint
      final response =
          await http.get(Uri.parse('https://dummyjson.com/products'));

      // Check if the response status code is 200 (OK)
      if (response.statusCode == 200) {
        // Parse the JSON response and extract the 'products' data
        final List<dynamic> data = jsonDecode(response.body)['products'];

        // Convert the JSON data to a list of Product objects and assign it to the products list
        products = data.map((json) => Product.fromJson(json)).toList();
      } else {
        // Throw an exception if the request fails
        throw Exception('Failed to fetch products');
      }
    }
  }
4. Buatlah sebuah folder baru dengan nama views di dalam folder lib. Lalu buat file dengan nama product_views.dart di dalam folder views lalu isi dengan script di bawah ini.
  import 'package:flutter/material.dart';
  import '../controllers/product_controller.dart';
  import '../models/product.dart';

  // Define a ProductView widget which is a StatefulWidget
  class ProductView extends StatefulWidget {
    @override
    _ProductViewState createState() => _ProductViewState();
  }

  // Define the state of the ProductView widget
  class _ProductViewState extends State<ProductView> {
    late Future<List<Product>> _futureProducts; // Declare a Future to store the list of products

    @override
    void initState() {
      super.initState();
      _futureProducts = _fetchProducts(); // Initialize the future with the result of _fetchProducts() method
    }

    // Define a method to fetch the products asynchronously
    Future<List<Product>> _fetchProducts() async {
      final productController = ProductController(); // Create an instance of the ProductController
      await productController.fetchProducts(); // Fetch the products using the controller
      return productController.products; // Return the fetched products
    }

    @override
    Widget build(BuildContext context) {
      return Scaffold(
        appBar: AppBar(
          title: Text('Product List'),
        ),
        body: FutureBuilder<List<Product>>(
          future: _futureProducts, // Use the future to retrieve the list of products
          builder: (context, snapshot) {
            if (snapshot.connectionState == ConnectionState.waiting) {
              // Show a loading indicator if the future is not yet complete
              return Center(
                child: CircularProgressIndicator(),
              );
            } else if (snapshot.hasError) {
              // Show an error message if there was an error fetching the products
              return Center(
                child: Text('Error: ${snapshot.error}'),
              );
            } else if (snapshot.hasData) {
              // Show the list of products if data is available
              final products = snapshot.data!;
              return ListView.builder(
                itemCount: products.length,
                itemBuilder: (context, index) {
                  final product = products[index];
                  return ListTile(
                    leading: Image.network(
                      product.thumbnail,
                      fit: BoxFit.cover, // Set the fit property to BoxFit.cover
                      width: 80, // Set a fixed width for the image
                      height: 80, // Set a fixed height for the image
                    ),
                    title: Text(product.title),
                    subtitle: Text(product.category),
                    trailing: Text('\$${product.price.toStringAsFixed(2)}'),
                  );
                },
              );
            } else {
              // Show a message if no data is available
              return Center(
                child: Text('No data available'),
              );
            }
          },
        ),
      );
    }
  }
5. Open the lib/main.dart file and change the script as below.
  import 'package:flutter/material.dart';
  import 'views/product_view.dart';

  void main() {
    runApp(MyApp());
  }

  class MyApp extends StatelessWidget {
    @override
    Widget build(BuildContext context) {
      return MaterialApp(
        title: 'Your App Name',
        theme: ThemeData(
          primarySwatch: Colors.blue,
        ),
        home: ProductView(),
      );
    }
  }
Also make sure the folder structure you create is the same as the folder structure I created as shown in the image below.

|
| MVC Folder |
6. We have done all the steps, then we can carry out trials. Open the emulator and run the application. If successful, the display will look like the image below.

|
| Final Result |
Cool! Now you can create a Flutter application that can display data from the internet and use MVC design to make your application neater. Please improve the application that has been created to make it more interesting.
That's it for our tutorial this time on how to display API data with the MVC pattern in Flutter. Hopefully this short tutorial is useful. If you have questions, please ask in the comments column. That's all and receive a salary.



0 Comments
Come on ask us and let's discuss together
Emoji