Hello everyone, welcome back at porkaone. On this occasion we will learn how to create a simple news application using the grid view widget and WordPress api. Are you curious? Come on, follow the details below.
I have previously made a news application with WordPress API at the following link https://www.porkaone.com/2023/12/creating-news-application-with.html. But the display still uses a list view. So, for those of you who are still confused about how to use grid view, then this is the right tutorial for those of you who want to implement this widget. Scroll down to immediately see the results.
How to Create a Grid View Flutter Application with WordPress Api
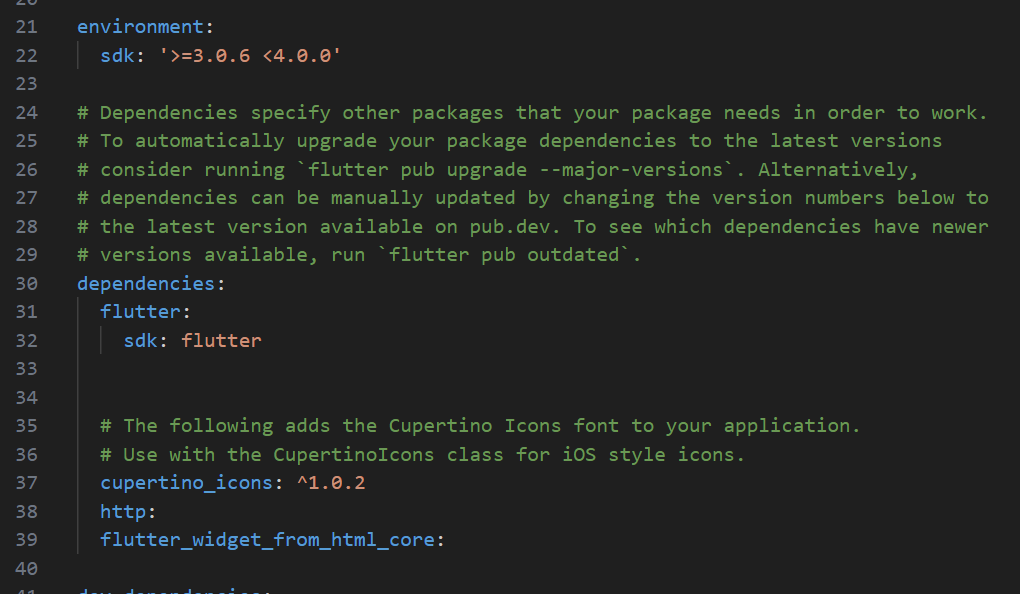
2. Then open the pubspec.yaml file. Then add the http: and flutter_widget_from_html_core: packages. Follow the example as below.
|
| Add Package |
3. Create a new file in the lib folder with the name api.dart. Copy the script below.
import 'dart:convert';
import 'package:http/http.dart' as http;

class Api {

  //method untuk mengambil data
  Future fetchData() async {

    //get data from api
    //we get data from the website hipwee and store it into dataJson variable
    //you can use url from the other website
    var dataJson = await http.get(Uri.parse('https://hipwee.com/wp-json/wp/v2/posts?_embed'));

    //convert string into dart object
    //This change aims to ensure that data can be managed easily
    var data = jsonDecode(dataJson.body);

    //get data
    return data;

  }
}
4. Create a new file in the lib folder with the name detail.dart. Copy the script below.
import 'package:flutter/material.dart';
import 'package:flutter_widget_from_html_core/flutter_widget_from_html_core.dart';

class Detail extends StatelessWidget {
  final String title;
  final String content;
  final String image;

  Detail({
    required this.title,
    required this.content,
    required this.image,
  });

  @override
  Widget build(BuildContext context) {
    //remove the text 'data' in 'data-src', this is usually found in
    String modifiedHtmlString = this.content.replaceAll('data-src', 'src');


    return Scaffold(
      appBar: AppBar(
        title: Text('Detail'),
      ),
      body: ListView(
        padding: EdgeInsets.zero,
        children: [
          Container(
            //device-wide image size
            width: double.infinity,
            height: MediaQuery.of(context).size.height * 0.33,


            //you can fill the container with images using this property
            decoration: BoxDecoration(
              image: DecorationImage(
                image: NetworkImage(this.image), // show image
                fit: BoxFit.cover,
              ),
            ),
          ),
          SizedBox(
            height: 10, //distance between image and content
          ),
          Padding(
            padding: EdgeInsets.only(left: 16, right: 16, top: 5, bottom: 16),
            child: Column(
              crossAxisAlignment: CrossAxisAlignment.start,
              children: [
                Text(
                  this.title, //show title
                  style: TextStyle(
                    fontSize: 22, //font size
                    fontWeight: FontWeight.w400, //letter thickness
                  ),
                ),
                SizedBox(
                  height: 20, //distance between title and content
                ),
                HtmlWidget(
                  modifiedHtmlString,
                ),
              ],
            ),
          )
        ],
      ),
    );
  }
}
5. Open the main.dart file. Then edit with the script below.
// ignore_for_file: prefer_const_constructors
import 'package:flutter/material.dart';

import 'api.dart';
import 'detail.dart';

void main() {
  runApp(
    MaterialApp(
      debugShowCheckedModeBanner: false,
      home: MyApp(),
    ),
  );
}

class MyApp extends StatefulWidget {
  const MyApp({super.key});

  @override
  State<MyApp> createState() => _MyAppState();
}

class _MyAppState extends State<MyApp> {
  Api api = Api();

  @override
  Widget build(BuildContext context) {
    return Scaffold(
        appBar: AppBar(
          title: Text('Flutter News'),
        ),
        body: FutureBuilder(
          future: api.fetchData(),
          builder: (_, snapshot) {
            if (snapshot.connectionState == ConnectionState.done) {
              var list = snapshot.data as List;

              return GridView.builder(
                itemCount: list.length,
                gridDelegate: SliverGridDelegateWithFixedCrossAxisCount(
                  // multiple grids displayed in one row
                  crossAxisCount: 2,
                ),
                itemBuilder: (_, index) {
                  return Container(
                    margin: EdgeInsets.all(8.0),
                    decoration: BoxDecoration(
                      border: Border.all(
                        color: Colors.grey,
                        width: 1.0,
                      ),
                    ),
                    child: InkWell(
                      onTap: () {
                        Navigator.push(
                          context,
                          // DetailPage is the destination page
                          MaterialPageRoute(
                            builder: (context) => Detail(
                              title: list[index]['title']['rendered'],
                              content: list[index]['content']['rendered'],
                              image: list[index]['_embedded']
                                  ['wp:featuredmedia'][0]['source_url'],
                            ),
                          ),
                        );
                      },
                      child: Column(
                        children: [
                          Flexible(
                            child: Image.network(
                              list[index]['_embedded']['wp:featuredmedia'][0]
                                  ['source_url'],
                              height:
                                  100,
                              fit: BoxFit.cover,
                              width: MediaQuery.of(context).size.width,
                            ),
                          ),
                          Padding(
                            padding: const EdgeInsets.only(
                                left: 5, right: 5, top: 5, bottom: 5,),
                            child: Text(
                              list[index]['title']
                                  ['rendered'],
                              style: TextStyle(
                                fontSize: 16,
                              ),
                              maxLines: 3,
                            ),
                          ),
                        ],
                      ),
                    ),
                  );
                },
              );
            } else {
              return Center(
                child: CircularProgressIndicator(),
              );
            }
          },
        ));
  }
}
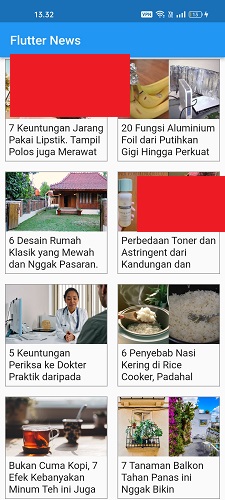
6. Ok, now we have done all the steps. Try running it now with the emulator. If successful, the display will look like the image below.
That's it for our short tutorial this time on how to create a news application with Flutter grid view and WordPress API. Hopefully this short tutorial is useful, that's all and thank you.





0 Comments
Come on ask us and let's discuss together
Emoji