Google Translate PHP
Google translate is one of the most popular language translator websites
used by netizens today. Due to its popularity, this one feature is often
used by developers to make their websites able to translate into any
language. But now you don't have to worry about how to implement it. because
many developers have developed plugins and extensions that can be easily
used in your projects.
On this occasion, we will use stichoza/google-translate-php. This is
one of the libraries that can change your web page to the desired language.
Because the translator uses Google, you don't need to worry about its
reliability.
How To Use Google Translate In Laravel
1. Install new laravel project or use existing laravel project. You can use Laravel version 6,7,8,9 and so on.2. Next, enter the project directory, then run the composer require stichoza/google-translate-php command in cmd or terminal. Then wait for the installation to finish

|
3. Open the config/app.php file. Change and add aliases like the script below.
'aliases' => [
  ...
  ...
  ...
  'GoogleTranslate' => Stichoza\GoogleTranslate\GoogleTranslate::class

],
4. Create a route in the web.php file. This route will be redirected to the blade page later. Follow the script as below.
Route::get('lang', 'App\Http\Controllers\LangController@index');
5. Create a new controller by running the php artisan make:controller LangController command. Then open LangController.php and change its contents with the script below.
<?php

  namespace App\Http\Controllers;

  use Illuminate\Http\Request;

  class LangController extends Controller
  {
      public function index(Request $request)
      {
          //create a language session, by default it uses english
          session()->put('language', Request('language') ?? 'en');

          return view('lang');
      }
  }
6. Create a file named lang.blade.php in the resources/views folder. Then follow the script as below.
<!DOCTYPE html>
  <html>

  <head>
      <title>How to Using Google Translate in Laravel</title>
      <meta charset="utf-8">
      <meta http-equiv="X-UA-Compatible" content="IE=edge">
      <meta name="viewport" content="width=device-width, initial-scale=1">
      <link href="https://cdn.jsdelivr.net/npm/bootstrap@5.0.2/dist/css/bootstrap.min.css" rel="stylesheet"
          integrity="sha384-EVSTQN3/azprG1Anm3QDgpJLIm9Nao0Yz1ztcQTwFspd3yD65VohhpuuCOmLASjC" crossorigin="anonymous">
  </head>

  <body>
      <div class="container">
          <br><br>
          <div class="card">
              <div class="card-body">
                  <h1 class="text-center mb-3">Using Google Translate on Laravel</h1>
                  <div class="row">
                      <div class="col-md-2">
                          <strong>Select Language: </strong>
                      </div>
                      <form action="{{ url('lang') }}">
                          <div class="row">
                              <div class="col-lg-5">
                                  <select class="form-select changeLang" name="language">
                                      <option value="en" {{ session()->get('language') == 'en' ? 'selected' : '' }}>
                                          English
                                      </option>
                                      <option value="fr" {{ session()->get('language') == 'fr' ? 'selected' : '' }}>France
                                      </option>
                                      <option value="es" {{ session()->get('language') == 'es' ? 'selected' : '' }}>
                                          Spanish
                                      </option>
                                  </select>
                              </div>
                              <div class="col-lg-3">
                                  <button class="btn btn-primary">Change</button>
                              </div>
                          </div>
                      </form>
                  </div>
                  <br><br>

                  <h3>{{ GoogleTranslate::trans('hello everyone, welcome and happy learning', session()->get('language') ?? 'en') }}
                  </h3>
                  <h3>{{ GoogleTranslate::trans('practice using google translate on laravel', session()->get('language') ?? 'en') }}</h3>
              </div>
          </div>

      </div>
  </body>

  </html>
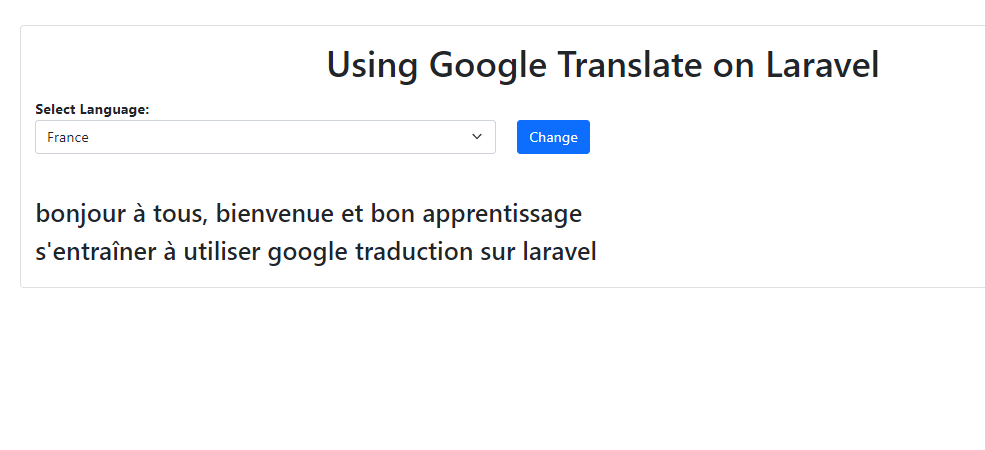
We have done all the steps. Please run the php artisan serve command. Then go to http://localhost:8000/lang. If the steps above are successful, the display will look like the image below.

|
| Before Translated |

|
| After Translated to French |
That's a short tutorial on how to use Google Translate on Laravel. Hopefully this short article is useful. If you have problems, questions or suggestions, please post a comment below. That is all and thank you.


0 Comments
Come on ask us and let's discuss together
Emoji